A loose or outdated faucet can look easy to replace—until you crawl under the sink. The mounting nut sits high behind the basin, supply lines block your hands, and an adjustable wrench has almost no room to swing. This is exactly where a Basin Wrench becomes useful.
This specialized plumbing tool reaches into the narrow space behind a sink. Its long shaft and pivoting jaw grip faucet mounting nuts that ordinary wrenches often cannot reach. A sliding T-handle then lets you turn the hidden fastener from below.
Learning how to use a basin wrench under a sink can make faucet removal, installation, and tightening far more controlled. It also reduces slipping, damaged nuts, scraped hands, and unnecessary cabinet disassembly.
The tool is simple. The angle is not.
This guide explains what a Basin Wrench does, how to set the jaw correctly, how to handle corrosion, and when another faucet tool is the smarter choice.
What Is a Basin Wrench?
A Basin Wrench is a long-handled plumbing wrench designed for faucet hardware in tight spaces. A traditional model has a steel shaft, a pivoting head, a spring-loaded serrated jaw, and a sliding crossbar at the lower end.
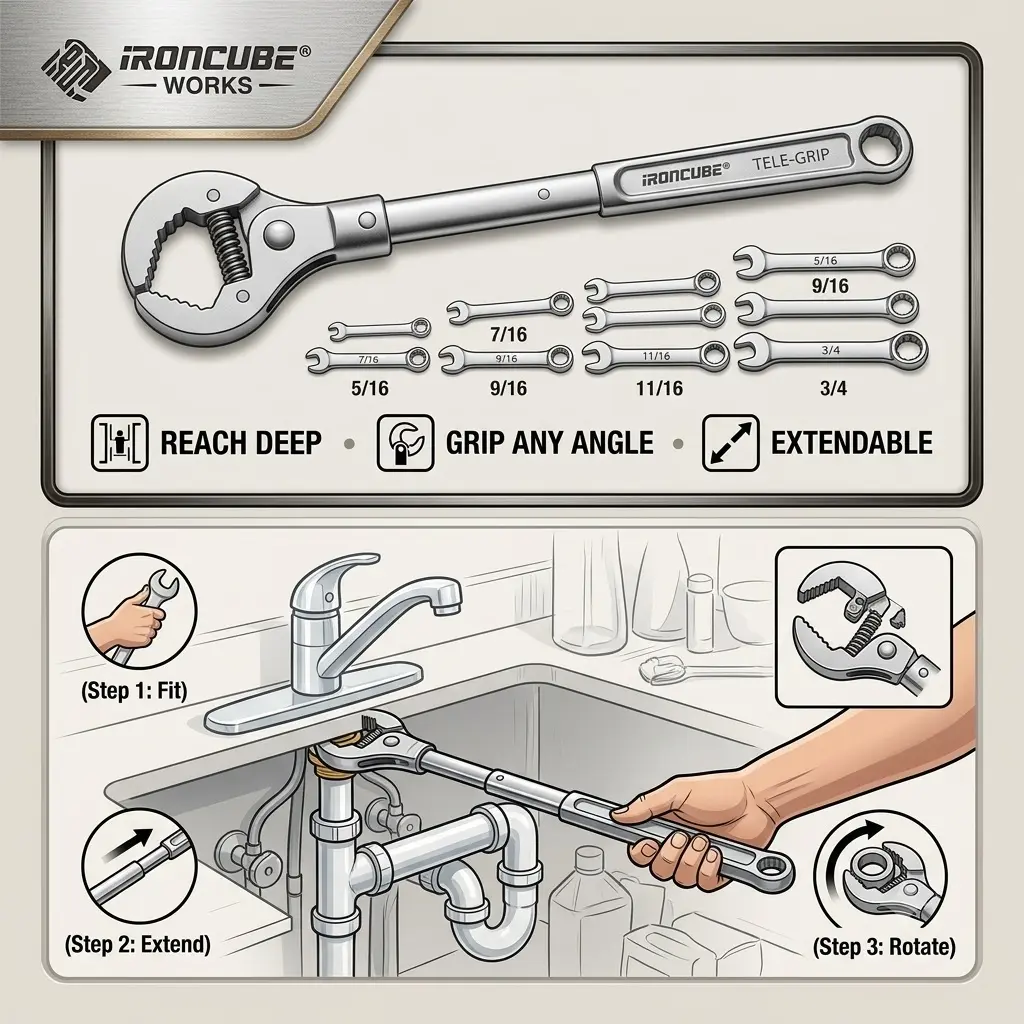
The head swings sideways around a hidden nut. As you turn the shaft in the correct direction, the movable jaw grips harder. That self-tightening action matters because you usually cannot hold the jaw closed by hand.
RIDGID describes its traditional models as one-handed ratcheting tools for tight under-sink work. Its published specifications show spring-loaded forged-alloy jaws, a head that can hold positions up to 90 degrees, and telescoping models that adjust from 10 to 17 inches. See RIDGID’s official basin wrench specifications.
You may also see the names sink wrench, faucet wrench, or basin spanner. However, some “faucet installer tools” use a long plastic body and shaped inserts instead of a pivoting metal jaw.
For wider wrench terminology, see this overview of wrench types.
Why Ordinary Wrenches Struggle Under a Sink
Faucet mounting nuts usually sit on threaded shanks below the sink deck. That places them beside the basin wall, behind hoses, and above the cabinet opening.
An adjustable wrench may fit the nut but lack turning clearance. Pliers often approach at an angle and touch only two corners. A deep socket may be blocked by supply tubes running through the mounting hardware.
A Basin Wrench solves the access problem through geometry. Its shaft keeps your hands below the obstruction. The rotating head reaches sideways. The T-bar creates turning force without a wide swing.
Modern faucets do not always need one. Some include a proprietary mounting tool, an Allen wrench, or a bracket-and-screw system. Delta’s published instructions show model-specific mounting hardware and supplied tools, so inspect the faucet manual before choosing your wrench. Delta’s bathroom faucet guide and kitchen faucet guide demonstrate how installation systems vary.
What Does a Basin Wrench Work On?
Its main job is turning faucet mounting nuts and retaining nuts. These fasteners clamp the faucet body to the sink or countertop.
Common uses include removing an old kitchen faucet, installing a bathroom faucet, tightening a faucet that rotates at its base, and reaching hardware behind a deep sink bowl.
A Basin Wrench can sometimes reach a supply-line fitting. Still, it is not automatically the correct tool. Compression nuts, braided connectors, plastic fittings, and shutoff valves may require an adjustable wrench or a second backup wrench.
Use the tool only when its jaw can sit squarely. Do not force serrated teeth onto a delicate fitting merely because access is difficult.
Verified Facts at a Glance
| Verified fact | Why it matters |
|---|---|
| Some traditional heads hold angles up to 90 degrees | The jaw can reach nuts beside a sink wall |
| Telescoping models may adjust from 10 to 17 inches | Extra reach helps behind deep kitchen basins |
| EPA says average household leaks can waste more than 9,300 gallons yearly | Prompt leak repair can save water |
| EPA estimates easy leak repairs may reduce water bills by about 10% | Small repairs can have measurable value |
The tool figures come from RIDGID. The leak data comes from the U.S. EPA WaterSense Fix a Leak Week guidance, which also reports nearly one trillion gallons of household water waste nationwide each year.
Main Parts of a Basin Wrench
The pivoting head changes angle relative to the shaft. For most faucet work, it sits nearly perpendicular to the handle.
The spring-loaded jaw contains gripping teeth. It tightens around the nut when turned in the working direction and releases during the return stroke.
The long shaft transfers force while your hands remain below the basin. Telescoping versions provide extra reach.
The sliding T-handle lets you turn the shaft inside a narrow cabinet. Center it for two-handed control, or slide it to one side when a wall blocks movement.
Before use, check that the hinge moves freely, the spring closes the jaw, and the teeth are not badly worn.
Before You Start
Clear the cabinet and place a towel across its base. Keep a shallow bucket below the supply connections.
Turn off both hot and cold shutoff valves. Open the faucet to release pressure and confirm that water stops. If a valve does not isolate the line, close the appropriate main supply before disconnecting anything.
Delta begins its kitchen installation guidance by telling users to shut off the sink’s water supply. Its bathroom instructions also recommend restoring water, flushing the faucet, and checking for leaks after installation.
Use a work light to identify the mounting hardware. Trace each supply line upward. Locate the threaded shank, washer, bracket, and retaining nut before reaching in with the tool.
Useful items include a Basin Wrench, adjustable wrench, screwdriver or Allen key, bucket, towels, safety glasses, work light, and a small brush. Penetrating oil may help on corroded metal hardware, but use it only where the product label allows.
How to Use a Basin Wrench to Remove a Faucet
Always compare these general steps with the faucet manufacturer’s instructions.
Step 1: Create Working Space
Disconnect supply lines or sprayer hoses only when they block the mounting nut. Keep the bucket underneath because depressurized lines still hold water.
If a pull-down faucet has a hose weight or quick connector, photograph the arrangement before taking it apart.
Step 2: Clean the Threads
Brush away loose mineral deposits and corrosion. For a rusted metal nut, apply a small amount of compatible penetrating oil and allow it to work.
Avoid soaking plastic nuts, rubber hoses, cabinets, or finished surfaces. Do not begin with a long cheater pipe. Excessive leverage can twist a bracket or damage the sink.
Step 3: Set the Jaw for Loosening
Hold the wrench upright and pivot the head across the shaft.
For a normal right-hand faucet mounting nut, turn counterclockwise while looking upward at the nut from below the sink.
Place the jaw around the nut and apply light pressure. If the claw grips harder, the orientation is correct. If it slips open, flip the head 180 degrees.
This is the most common beginner error. The tool may look seated even when the jaw faces the release direction.
Step 4: Seat the Jaw Deeply
Guide the head upward until both sides contact the nut. The serrated jaw should catch a flat, corner, tab, or strong edge.
Do not turn while only the tips touch. A shallow grip can round soft metal or deform plastic hardware.
Stabilize the upper shaft with one hand. Keep your face away from the T-handle’s movement.
Step 5: Break the Nut Loose
Apply slow, steady pressure to the T-bar. Avoid a sudden full-force jerk.
Once the nut moves, continue with short strokes. The jaw should release or ratchet during the return movement.
After one or two turns, the nut may spin by hand. Remove it carefully so it does not fall behind the cabinet.
Step 6: Stop the Faucet From Rotating
A tight nut may turn the faucet body above the sink. Ask someone to hold it, or brace the fixture with a protected hand.
Never clamp a visible faucet finish with toothed pliers. Scratches happen quickly.
Step 7: Lift and Clean
Remove the remaining hardware, then lift the faucet from above. Cut old sealant only when necessary, preferably with a plastic scraper near finished surfaces.
Clean the sink deck before installing the replacement. Old putty and mineral deposits can stop a new gasket from sitting evenly.
How to Tighten a Faucet With a Basin Wrench
Place the faucet and gasket according to the manufacturer’s instructions. From below, install the washer, bracket, and mounting nut in the correct order.
Start the nut by hand. This confirms that the threads are aligned and helps prevent cross-threading.
Hold the faucet in its final position. Flip the Basin Wrench head so the jaw grips while turning clockwise from below. Tighten with short, controlled strokes.
Stop when the faucet base no longer shifts and the gasket sits evenly. Do not use the T-bar like a breaker bar.
There is no universal torque value for every faucet mounting nut. Sink materials, brackets, gaskets, and plastic or metal nuts differ. Delta’s installation instructions, for example, use model-specific mounting tools and tell installers to verify alignment before final tightening.
Reconnect the lines, restore water slowly, and inspect every joint while the faucet is both off and running.
Which Direction Should the Basin Wrench Face?
Do not rely only on “jaw left” or “jaw right.” Your viewing angle can reverse those descriptions.
Use one dependable rule:
The movable jaw must close harder when the handle turns in the direction you want the nut to move.
For loosening a standard mounting nut, turn counterclockwise from below. For tightening, turn clockwise.
Test with gentle pressure. If the jaw opens or slips immediately, flip the head.
Basin Wrench vs. Other Under-Sink Tools
| Tool | Best use | Main limitation |
| Basin wrench | Traditional mounting nuts behind a basin | May slip on rounded or unusual plastic nuts |
| Faucet installer tool | Tabbed nuts and model-specific fittings | Insert must match the hardware |
| Adjustable wrench | Accessible valves and supply nuts | Needs room to swing |
| Deep socket | Recessed hex nut with a clear center path | Supply tubes may block access |
| Crowfoot wrench | Hex fastener with limited side clearance | Harder to stabilize |
| Pliers | Irregular hardware where finish is unimportant | Can crush or mark soft parts |
Some modern faucets include a long installation tool. Use it when the manual specifies it. Choose the Basin Wrench when the original tool is missing, the nut is conventional, or the cabinet blocks ordinary tools.
RIDGID’s separate faucet installation tool is designed for several common tabbed mounting nuts and other sink fittings. That supports an important distinction: a pivot-jaw basin tool and a multi-function faucet tool overlap, but they are not the same.
How to Handle a Stuck Faucet Nut
First, confirm that you are turning the mounting nut—not a nearby supply fitting. Improve the lighting, verify the jaw direction, and clean the exposed threads.
For compatible metal hardware, apply a small amount of penetrating oil. Try moving the nut a fraction tighter before loosening it. That small motion can disturb corrosion.
If a plastic nut has damaged tabs, use a matching faucet socket or installer tool. Stop if the plastic begins to crack.
A rounded metal nut may require a nut splitter, oscillating tool, hacksaw, or removal from above. Cutting close to a sink, countertop, supply tube, or electrical outlet carries real risk.
Call a plumber when shutoff valves fail, pipes twist, corrosion extends into the supply plumbing, or safe cutting access is unavailable.
Common Mistakes to Avoid
The most common mistake is setting the jaw backward. Another is gripping only one corner instead of seating the head deeply.
Excessive force causes a different problem. Removal may require leverage, but installation usually requires control. Over-tightening can distort a bracket, damage a gasket, strip plastic threads, or stress the sink.
DIY users also confuse mounting nuts with supply-line nuts. One holds the faucet to the sink. The other seals a water connection.
Finally, test for leaks. Dry the cabinet, restore water slowly, and touch each connection with a clean tissue. Small beads often appear on tissue before they are obvious by sight.
How to Choose the Right Basin Wrench
A basic fixed model may be enough for occasional bathroom work. A deep kitchen sink or thick countertop may justify a telescoping version.
Compare five factors: jaw capacity, shaft reach, head tension, tooth condition, and T-handle clearance.
The tool must open wide enough for the nut and reach beyond the basin. A head that holds its angle is easier to position one-handed. Sharp, clean teeth improve grip.
RIDGID’s telescoping model adjusts from 10 to 17 inches and is intended for faucet fittings and retaining nuts. That example shows why reach can matter as much as jaw width.
Choosing the Correct Wrench for Other Jobs
A specialized sink tool should fill an access gap, not replace a complete wrench set.
For general mechanical work, browse the IRONCUBE wrench collection or the 10-piece metric ratcheting wrench set. The product page lists common metric sizes and a ratcheting box end, but this style does not replace a pivoting under-sink tool.
Faucet brackets may also use screws or hex fasteners. The IRONCUBE screwdriver range and guide to magnetic screwdriver sets can help complete a repair kit.
Heavy equipment and structural fasteners require entirely different tools. See extra-large heavy-duty ratcheting wrenches, jumbo ratchet wrenches, the guide to a torque friction wrench requiring less effort, and this friction wrench versus torque wrench comparison.
Further buying resources include the 2026 friction wrench set guide, structural steel and bridge wrench guide, and advice on wholesale jumbo wrench sets.
Examples for large fasteners include the 1-7/8-inch friction wrench, 36 mm torque friction wrench, and IRONCUBE jumbo friction ratcheting wrench.
Marketplace examples also include a 72-tooth ratcheting wrench set and brake line wrench set.
Visit the IRONCUBE Tools YouTube channel for demonstrations. For product or sourcing questions, use the contact page or return to the IRONCUBE homepage.
Care and Storage
Wipe the jaw, hinge, shaft, and T-bar after use. Dry the tool before storage.
Add a small amount of light tool oil to a stiff pivot, then remove the excess. Inspect the spring and teeth because a weak spring or rounded jaw increases slipping.
Store the Basin Wrench with its head folded against the shaft.
Frequently Asked Questions
What is a basin wrench used for?
A Basin Wrench reaches and turns faucet mounting nuts hidden behind or beneath a sink bowl. Its long shaft and pivoting jaw work where an adjustable wrench lacks access or swing room.
How do you use a basin wrench under a sink?
Set the Basin Wrench head across the shaft, place the jaw around the mounting nut, and test that it grips in the intended direction. Turn counterclockwise to loosen or clockwise to tighten when viewing the nut from below.
What size basin wrench do I need?
Choose a Basin Wrench whose jaw capacity covers the mounting nut and whose shaft reaches the hardware. Deep kitchen sinks may require a telescoping model, while compact vanities may favor a shorter tool.
Can I remove a faucet without a basin wrench?
Sometimes. A supplied faucet tool, deep socket, crowfoot wrench, or adjustable wrench may work when access allows. However, a Basin Wrench is often the simplest choice for a conventional nut trapped behind the basin.
Why does my basin wrench keep slipping?
A Basin Wrench usually slips because the head faces the wrong direction, the jaw sits too shallowly, or the nut is rounded. Flip the head, reseat the jaw, clean the nut, and apply controlled pressure.
Can a basin wrench tighten supply lines?
A Basin Wrench may reach certain supply fittings, but its toothed jaw can damage soft connectors. Use the fitting manufacturer’s recommended tool and support the valve or adjoining part with a backup wrench.
Final Summary
A Basin Wrench solves one difficult problem extremely well: reaching faucet mounting hardware behind a crowded sink.
Its long shaft reaches past the basin. Its pivoting jaw grips from the side. The sliding T-handle lets you turn the fastener inside a narrow cabinet.
Correct jaw orientation is the key. Set the head so the movable claw tightens its grip in the direction you want the nut to turn. Start new nuts by hand, avoid unnecessary leverage, and follow the faucet manufacturer’s instructions.
Not every modern faucet needs this tool. Some include dedicated mounting wrenches or screw-based brackets. Yet when a traditional nut sits high behind the sink bowl, few tools provide the same reach and control.